Configure SQL with managed identity
This post will show you how we configure Azure SQL Server with a managed identity, it will also show you the most common pitfalls.
Configure Azure Groups as database users
Prerequisites
To be able to follow along this post, I’ll assume you know what managed identities are and that you have at least one application deployed with the identity switch turned on. You also need a SQL server deployed in Azure.
You should use Entra groups
As shown below, you will see that you need to execute some sql script to allow access to a database in your SQL server. This is possible to do for each managed identity you want to allow access to, but this will quickly become unmanageable.
We use designated groups to allow database access. This way you can manage everything access related in Azure. All other access rules are managed in Azure under the Access Policies in the portal, but for SQL you need to create the account in Azure and then execute an SQL script to grant access. We figured that managing the access inside the sql server could be moved to Azure by utilizing groups.
Sample groups (change accordingly):
- A group called
sql_{databaseServerName}_adminthis groups will be set as an Azure AD admin of the sql server. - A group called
sql_{databaseName}_ownerthis groups will get theownerrole in the database. - A group called
sql_{databaseName}_writerthis groups will get thedb_datawriterand thedb_datareaderrole in the database. - A group called
sql_{databaseName}_readerthis groups will get thedb_datareaderrole in the database.
You’ll need to created these groups up-front, so go ahead and do that through any means you see fit. You can also add the appropriate users or applications to those groups.
Configure the database Azure AD Admin
You will need to set the Azure AD Admin in the portal to the first group, you just created, as described here (be sure to pick the group!)
With previous versions of the SQL Client in .NET you could specify which tenant should be used for that specific SQL server. That options is removed! It now uses the configured Azure AD Admin to automatically discover which tenant to use. You may no longer remove the Azure AD Admin under any circumstance, this will result in you no longer being able to login!
Once configured, you must NOT remove the Azure AD Admin (set to the group), you can however remove the account you used to execute the script below from the group. As long as the group stays the configured Azure AD Admin!
Grant access
Once you configured the Azure AD group to be the database admin, and you have an account that is added to that group, you will be able to access the database through a tool of choice (as long as it supports SQL login with Azure AD). I’ve picked SQL Server Management Studio. For this to work you have to use Azure AD login!
Go ahead and connect to the desired sql server and open the new query window in the desired database, if you have multiple database in the same server, you will have to execute this script multiple times. These steps change access at database level and not at server level. I would not re-use Azure AD groups, but your requirements might be different.
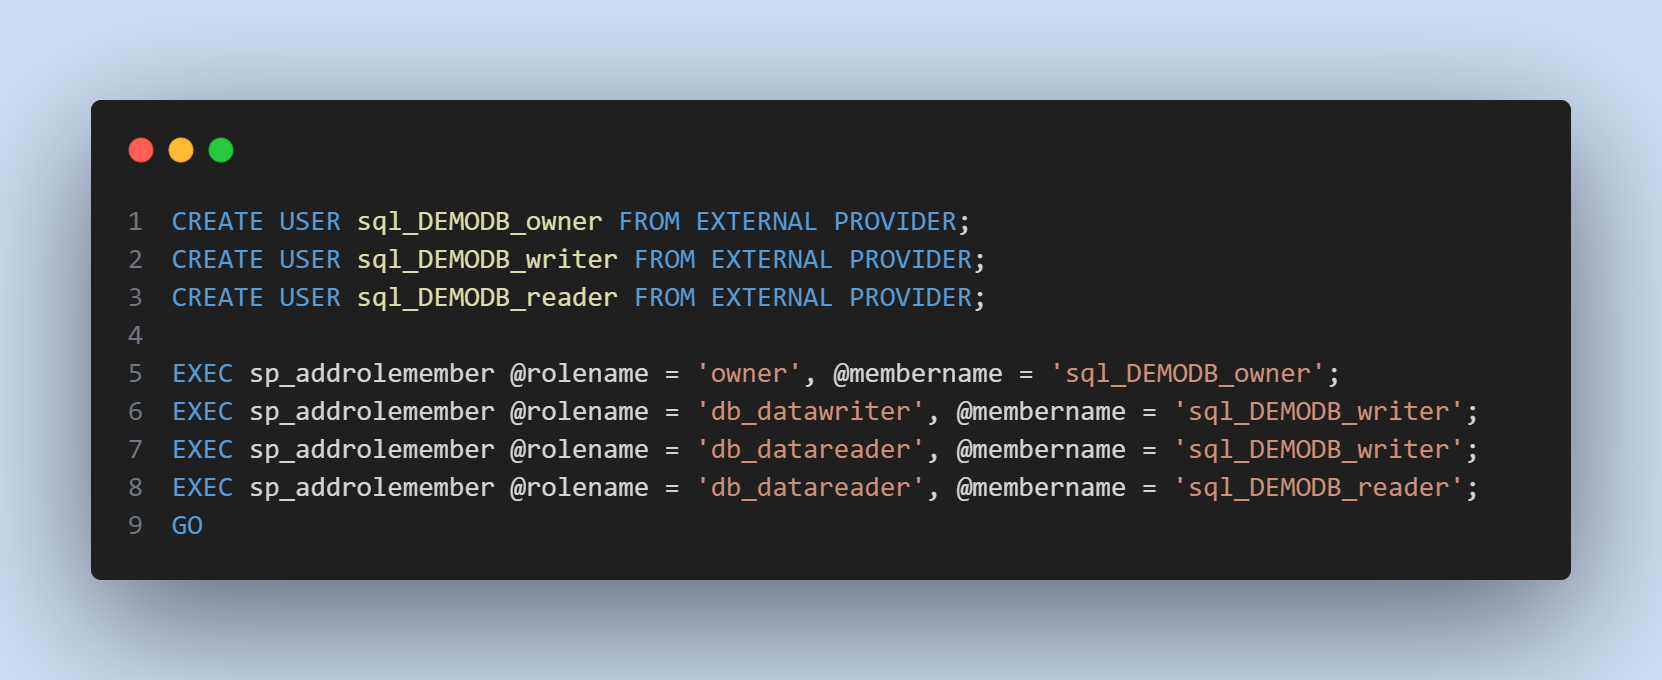
The script below has several references to DEMODB, replace this (with search and replace) by your own database name.
USE DEMODB;
GO

-- Adding all the groups as users of the database
-- https://learn.microsoft.com/sql/t-sql/statements/create-user-transact-sql?view=sql-server-ver16&wt.mc_id=SEC-MVP-5004985#azure_active_directory_principal
CREATE USER sql_DEMODB_owner FROM EXTERNAL PROVIDER;
GO
CREATE USER sql_DEMODB_writer FROM EXTERNAL PROVIDER;
GO
CREATE USER sql_DEMODB_reader FROM EXTERNAL PROVIDER;
GO

-- Grant access to the just created users
-- https://learn.microsoft.com/sql/relational-databases/system-stored-procedures/sp-addrolemember-transact-sql?wt.mc_id=SEC-MVP-5004985
EXEC sp_addrolemember @rolename = 'owner', @membername = 'sql_DEMODB_owner';

-- I don't want to get into the details, but you'll need reader access if you want to use WHERE in your update/delete statements.
EXEC sp_addrolemember @rolename = 'db_datawriter', @membername = 'sql_DEMODB_writer';
EXEC sp_addrolemember @rolename = 'db_datareader', @membername = 'sql_DEMODB_writer';

EXEC sp_addrolemember @rolename = 'db_datareader', @membername = 'sql_DEMODB_reader';
GO
Final note
If everything went well, your Azure SQL databases will now be available to everybody (users or managed identities) in those just created groups. This allows your devops teams to managed who has access to the database without then requiring an SQL script. You might even be able to use PIM to temporary request access as an database owner or even the sql server admin.
By trial and error we noticed that it might take some time for SQL to notice membership changes in those groups, as if they are cached at the SQL server side. I cannot find a definitive answer what the delay might be, just know that it’s there.
A user needs access to the master database, if he/she wants to browse through the databases. If you don’t grant them access to this special database they have to enter the database name before connecting.
And lastly, don’t remove the group as an Azure AD admin!
There was a tweet here, but it is deleted forever.