The Best GitHub workflow for a .NET app
I might have build the best continues integration pipeline for a .NET app ever. How do you set up a workflow to automatically test your .NET application? I’ve created a workflow that has all the things you might need to get started.
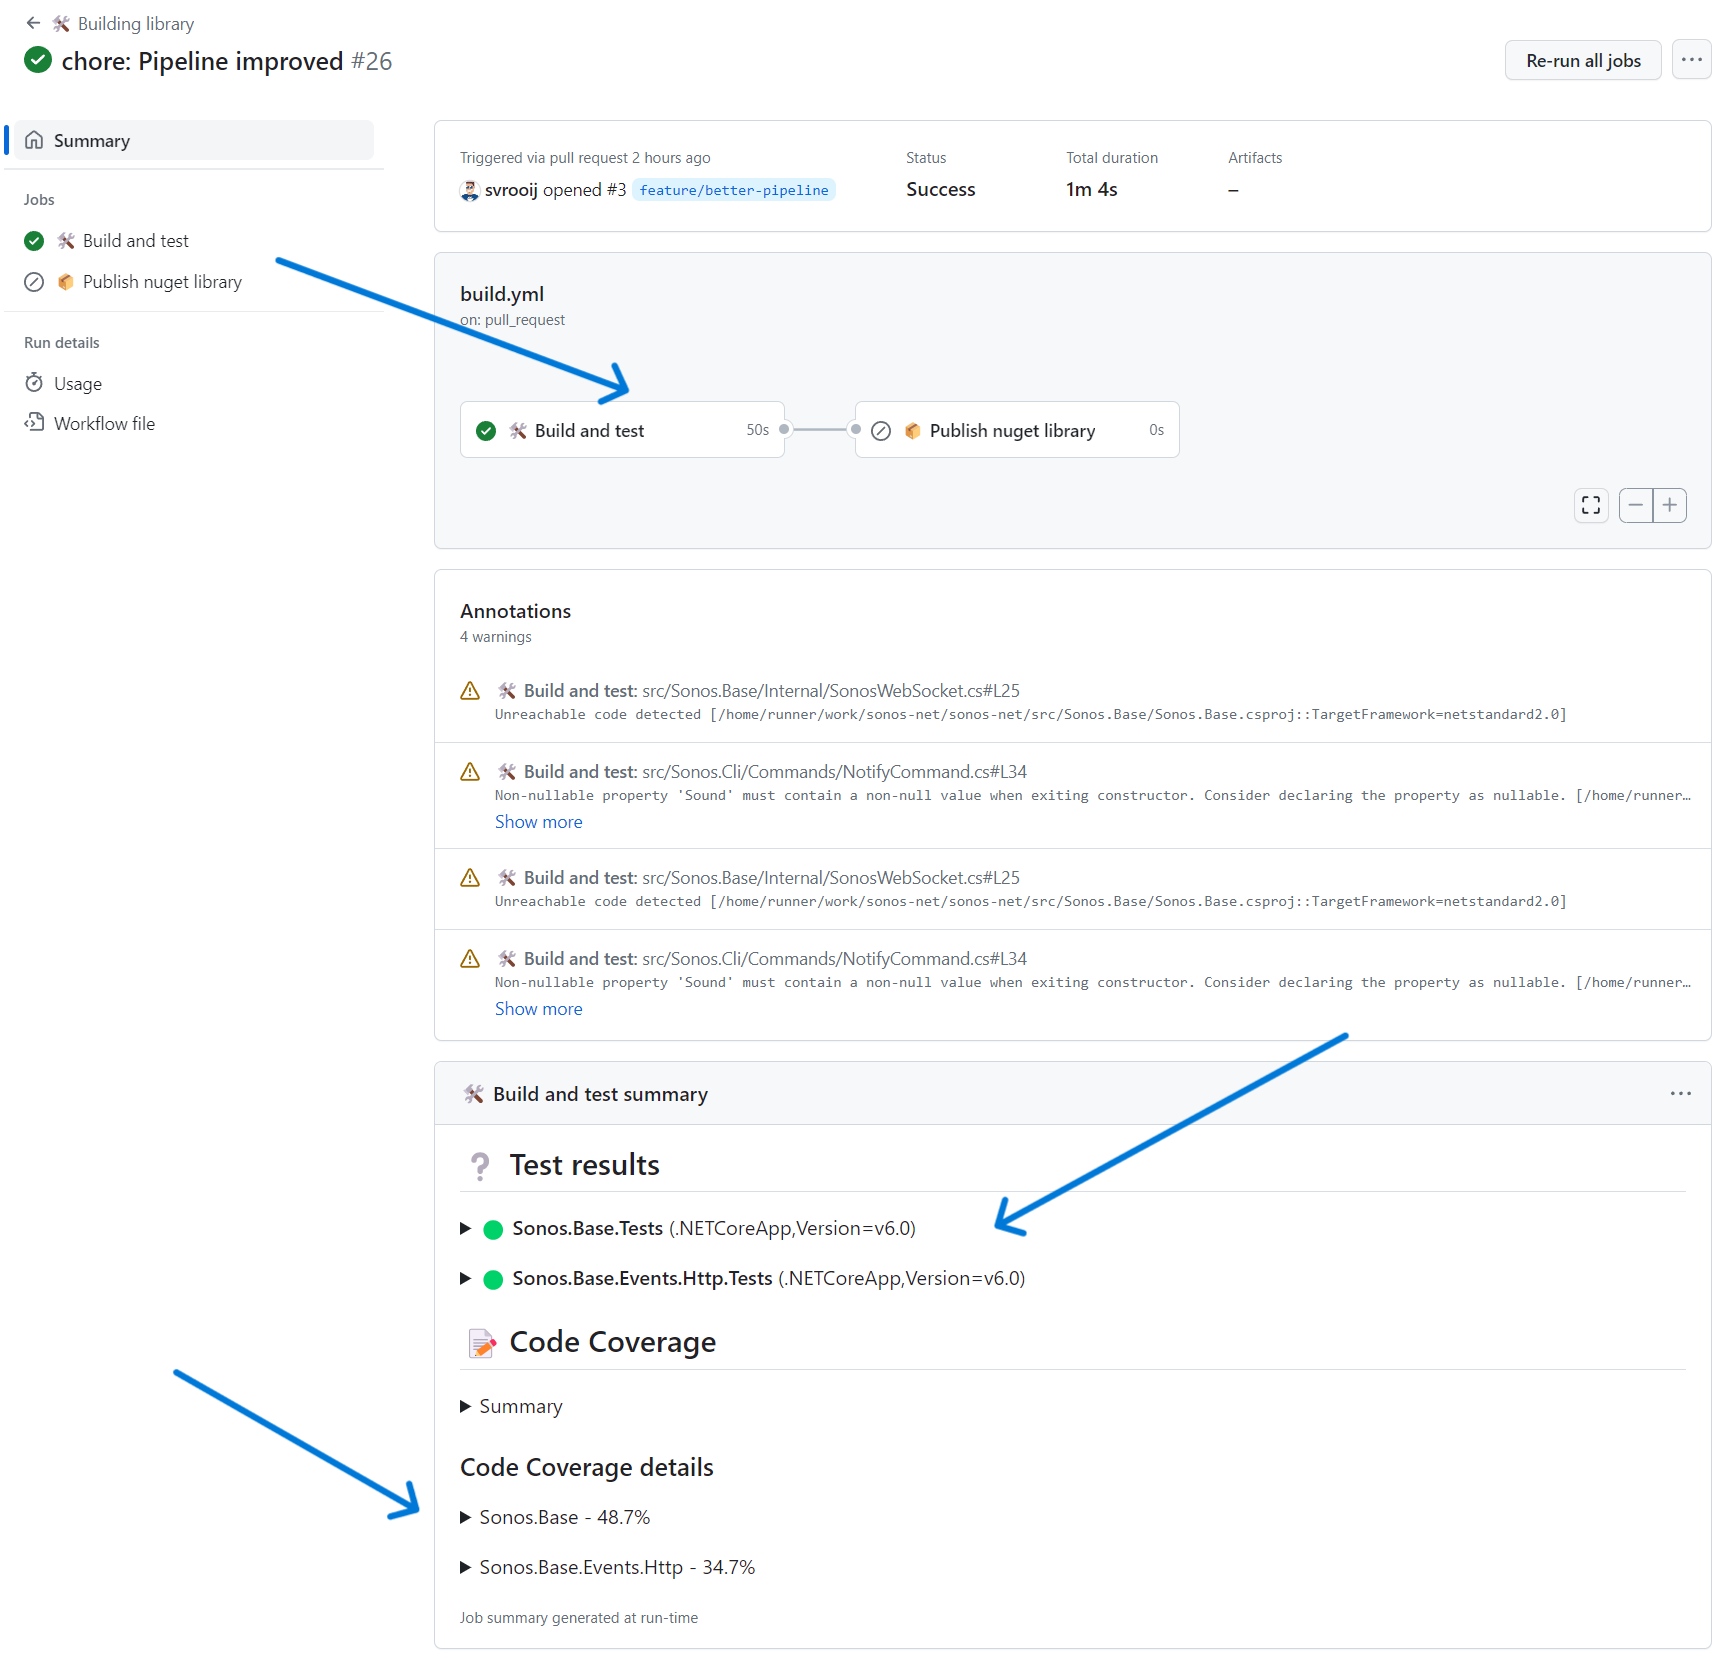
Github actions build summary
Features
Before I get into the details of the workflow file, it has the following features:
- Descriptive names for the workflow, the jobs and all the steps.
- Automatic building and testing for each push and/or pull request.
- Manually starting the workflow enabled.
- Hand picked emojis for each descriptive name.
- Build warnings connected to the actual code lines.
- Test results in the Job Summary.
- Code coverage in the job summary, without any external cloud service.
Workflow file
If you just want to ready to run .NET workflow file, check out build.yml in svrooij/sonos-net. You should probably remove the publish job since that is specific to this project.
Github has support to automatically run several actions in a defined order. We call this a workflow. Workflows are defined as yaml files in the .github/workflows folder in your repository. Go ahead and create yourself a build.yml file in this folder (that you’ll probably have to create). I got the entire workflow file broken down in small pieces, with an explanation what that part does.
Workflow definition
This first part defines the workflow name, and 3 triggers in the on section. The on section is for all jobs in that file. workflow_dispatch is so you can trigger the workflow manually. The push and pull_request triggers have specific branches defined when they should be triggered. It’s also the start of the jobs part. Each workflow file needs at least 1 job, and they can depend on the previous job.
name: 🛠️ Building library

on:
  workflow_dispatch:
  push:
    branches:
      - main
      - develop
      - feature/*
  pull_request:
    branches:
      - main
      - develop

jobs:
Build job
This is the first part of the build job, mind the indentation, it’s YAML so it is super important that the indentation is correct. This first part of the build job has a descriptive name 🛠️ Build and test that will show up in the GitHub interface. It also defines on which kind of agent it will run ubuntu-latest, in this case. You’ll also see the first 2 steps of the build job here.
The first step called the actions/checkout@v3 action, this action, build by GitHub, does a git checkout with credentials needed for this repository. The second step calls actions/setup-dotnet@v3 to make sure the correct version of .NET is installed on the agent running the job. In this case 6.x meaning the highest minor version of 6.
There are literally thousands (19268 but who is counting) of actions available to use in your workflows. Those in the actions organization are build by GitHub and can be trusted, other actions are build by other users like me. Your organization might not want you to use third-party actions!
Second part of build.yml
build:
name: 🛠️ Build and test
runs-on: ubuntu-latest
steps:
- name: 👨💻 Check-out code
uses: actions/checkout@v3
- name: 👨🔧 Setup .NET Core SDK
uses: actions/setup-dotnet@v3
with:
dotnet-version: 6.x
Dotnet matcher
By default the build error of .NET are not shown next to the actual code that is broken. We need to tell GitHub how exactly it should parse errors and warnings, this is done with a problem matcher.
Fourth part of build.yml
      - name: 🔍 Enable problem matchers
        run: echo "::add-matcher::.github/matchers/dotnet.json"
You should also create the matcher file at .github/matchers/dotnet.json with the following content.
{
    "problemMatcher": [
        {
            "owner": "dotnet-file",
            "pattern": [
                {
                    "regexp": "^(.+)\\((\\d+).+\\):\\s(\\w+)\\s(.+)\\:\\s(.*)$",
                    "file": 1,
                    "line": 2,
                    "severity": 3,
                    "code": 4,
                    "message": 5
                }
            ]
        },
        {
            "owner": "dotnet-run",
            "pattern": [
                {
                    "regexp": "^.+\\s\\:\\s(\\w+)\\s(.*)\\:\\s(.*)$",
                    "severity": 1,
                    "code": 2,
                    "message": 3
                }
            ]
        }
    ]
}
Restoring packages
By default a dotnet build also does a package restore, in this workflow I’ve created a separate step for restoring packages. That means you can now see how long that step takes and if it might need caching. For the sample workflow I added caching of the downloaded nuget packages, this speeds up your builds if you don’t change the packages often.
Fifth part of build.yml
- name: 🦸♂️ Restore steriods # this is the caching step, remove if you don't think you need it
uses: actions/cache@v3
with:
path: ~/.nuget/packages
# Look to see if there is a cache hit for the corresponding requirements file
key: ${{ runner.os }}-nuget-${{ hashFiles('**/packages.lock.json') }}
restore-keys: |
${{ runner.os }}-nuget
- name: 🎒 Load packages
run: dotnet restore
The caching step above uses, dotnet package lock files. To get those in your project you will need to add <RestorePackagesWithLockFile>true</RestorePackagesWithLockFile> to each of your projects, and restore at least once to generate the file.
<Project Sdk="Microsoft.NET.Sdk">
  <PropertyGroup>
    <TargetFrameworks>net7.0;net6.0;netstandard2.0</TargetFrameworks>
    <ImplicitUsings>enable</ImplicitUsings>
    <Nullable>enable</Nullable>
    <!-- Add the following line -->
    <RestorePackagesWithLockFile>true</RestorePackagesWithLockFile>
  </PropertyGroup>
  ...
</Project>
Building the projects
We are getting at the fancy parts, let’s build all the projects in the solution. If you don’t want to build all the projects you can exclude them in your solution file, or you can build specific projects. In the sample I’m just building all the projects. Mind the --no-restore argument. We already did a restore in the previous step, to tell dotnet that there is no need to restore you add that argument, it will skip the check (and fail if you did not restore packages before). You can also see the --configuration Release arguments, the code is meant for production right, so stop building debug builds in your pipeline.
Sixth part of build.yml
      - name: 🛠️ Build code
        run: dotnet build --configuration Release --no-restore
Run tests
For this project I’ve build several test projects, this post will not go into any details. Your search engine should be able to provide you with any good guides.
The catch here is that I’ve created more then one test project, which might cause issues if you want a code coverage report.
This is the first part of the workflow that needs changing depending on your project, copy the line that starts with dotnet test for each test project and change the path (tests/Sonos.Base.Tests) to match each project. So if you have 4 test projects, there should be 4 of these lines.
This will execute each of the test projects in sequence vs parallel, this is important because we need it to merge the generated code coverage.
Seventh part of build.yml
      - name: 🫣 Testing code
        run: |
          echo "## ❔ Test results" >> $GITHUB_STEP_SUMMARY
          dotnet test --configuration Release -v minimal --no-build --logger GitHubActions '/p:CollectCoverage=true;CoverletOutputFormat="json,lcov,cobertura";MergeWith=${{github.workspace}}/coverage.json;CoverletOutput=${{github.workspace}}/coverage' tests/Sonos.Base.Tests -- RunConfiguration.CollectSourceInformation=true
          dotnet test --configuration Release -v minimal --no-build --logger GitHubActions '/p:CollectCoverage=true;CoverletOutputFormat="json,lcov,cobertura";MergeWith=${{github.workspace}}/coverage.json;CoverletOutput=${{github.workspace}}/coverage' tests/Sonos.Base.Events.Http.Tests -- RunConfiguration.CollectSourceInformation=true
The echo "## ❔ Test results" >> $GITHUB_STEP_SUMMARY command is to write a specific header (in Markdown) to the job summary. You can also use this in other steps.
The command above uses the cross platform tool Coverlet to generate several code coverage files, Coverlet is instructed to merge the current coverage results with the results from the previous run. And since it points to the same file, that file will be updated with all coverage results.
It also uses GitHubActionsTestLogger to output the test results in such a way that they are added to the GitHub job summary. Add the following dependencies to all your test projects.
    <PackageReference Include="coverlet.collector" Version="6.0.0">
      <IncludeAssets>runtime; build; native; contentfiles; analyzers; buildtransitive</IncludeAssets>
      <PrivateAssets>all</PrivateAssets>
    </PackageReference>
    <PackageReference Include="coverlet.msbuild" Version="6.0.0">
      <IncludeAssets>runtime; build; native; contentfiles; analyzers; buildtransitive</IncludeAssets>
      <PrivateAssets>all</PrivateAssets>
    </PackageReference>
    <PackageReference Include="GitHubActionsTestLogger" Version="2.3.2">
      <PrivateAssets>all</PrivateAssets>
      <IncludeAssets>runtime; build; native; contentfiles; analyzers; buildtransitive</IncludeAssets>
    </PackageReference>
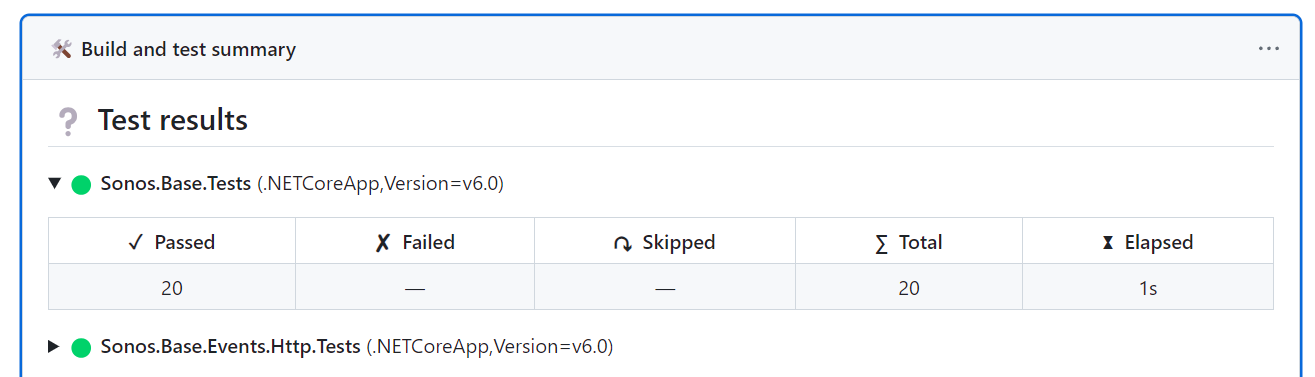
Test results by GitHubActionsTestLogger
Code Coverage
Code coverage is a metric that might be used to see how much of the code is reached when the tests execute. There are several cloud service that provide addition analytics on cloud coverage, but in my opinion it starts by seeing them in a way that everybody understands. I’m not saying you should not use an external service for the advanced analytics, I’m just saying that I want the code coverage available right in GitHub in the job summary.
The instructions above generate a single code coverage report, by amending the previous results, in several formats (json, lcov and cobertura). That is by design, those cloud services might need a different format, and this covers most of them.
Let’s use the ReportGenerator by Daniel Palme to generate a nice summary of the code coverage and add that to the job summary as well.
This command installs the report generator tool (.NET 6 required), generates the MarkdownSummaryGithub report from the coverage.cobertura.xml file from the previous step, while ignoring the *.g.cs files (source generators anyone?).
It then uses sed to replace the # Summary Markdown header with ## 📝 Code coverage (because I like that better).
And lastly, using cat, it sends the content of the report to the job summary.
Eight part of build.yml
      - name: 📝 Code Coverage report
        run: |
          dotnet tool install --global dotnet-reportgenerator-globaltool --version 5.1.23
          reportgenerator -reports:${{github.workspace}}/coverage.cobertura.xml -targetdir:${{github.workspace}}/report -reporttypes:MarkdownSummaryGithub "-filefilters:-*.g.cs" -verbosity:Warning
          sed -i 's/# Summary/## 📝 Code Coverage/g' ${{github.workspace}}/report/SummaryGithub.md
          sed -i 's/## Coverage/### Code Coverage details/g' ${{github.workspace}}/report/SummaryGithub.md
          cat ${{github.workspace}}/report/*.md >> $GITHUB_STEP_SUMMARY
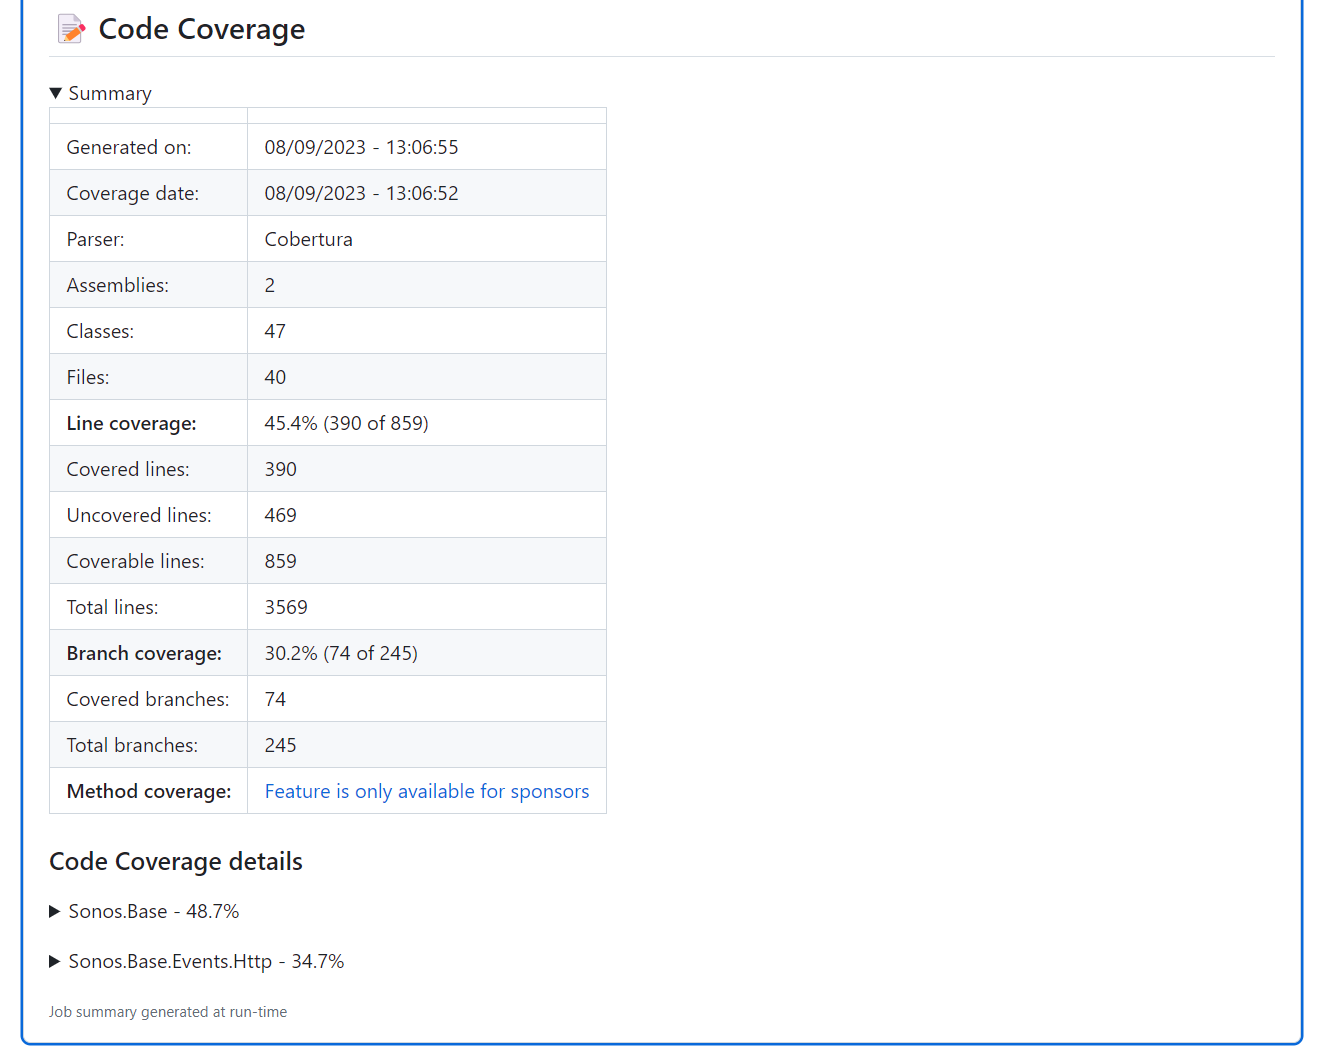
Code Coverage in Job Summary
Conclusion
This post should get you going with automated testing, in a next post I’ll might explorer the publishing part. At least this new workflow should bring you some joy, with all those emojis in the otherwise pretty boring workflow interface.
I had a hard time figuring out how to merge those code coverage results, so I hope it helps.
And one last confession, you won’t be the first one that has to try multiple times before getting the workflow just right. Yaml is a pain with indentation. Don’t do it in your main branch. Do it in a feature/workflow branch, that will also trigger (if you used the triggers from the sample) and then you can try it several times before squashing it into your main branch.
Let me know what you think, did I build The Best GitHub workflow for a .NET app? Twitter or LinkedIn.
There was a tweet here, but it is deleted forever.